Tag Archives: writing tools

Here There Be Dragons: Maps in Fiction

Jon Roberts_portrait
Artist, Jonathan Roberts

Guest Post by Jonathan Roberts

Let’s get one thing out of the way right now.

A map shouldn’t be pretty.

I know what you’re thinking – those posters of Middle Earth are gorgeous. Of course a map should be beautiful! But for worldbuilding purposes a pretty map is a Very Bad Thing. Beautiful things are precious, and we tend to want to leave precious things pristine and untouched. When we’re building worlds we need to break things, and often. So, out with any thoughts that we’re making a pretty map. We’ll be making a functional map. In fact we’ll be making many maps, one after the other. In exactly the same way that your notes are not the final manuscript, a map isn’t the final world. It’s a visual notepad, and you should be crossing things out, erasing sections and rebuilding from scratch as you go along.

So we won’t be needing photoshop today, we need a pad of scratch paper and a pencil. Ready? Right, let’s build a world.

First of all, think about the world you need to build. In many cases this is a defined area that’s much smaller than the planet you’re on. Very few stories truly span a globe, so let’s begin by cutting down to the area that the story explores. This keeps the work focused on a reasonable area, and means there will always be distant and mysterious lands to explore down the line.

In your tale there will be nations, city states or power centers of some form. Start by making a note of their relationships to one another. Are they at war? Are they aloof? Do they feud over resources or are they closely allied? Think over the things that make them stand out. Are they famous for their expansive grain fields? Their iron? Their navy? I’m sure you can see the theme here. Nations are defined by the geography they inhabit as much as we define the geography by the nation. A nation with a large navy needs sea access, but it should also have natural defenses like a mountain range that allows the nation to neglect other military forces in favor of its navy. Two countries at war need to be close, and need to have a means of attacking one another.

Focus on major terrain at this point–how much coastline and mountain range. Make notes about other terrain that comes to mind–the tulip fields of Alak’tor, the salt mines of Keshel. Those will come in useful later.

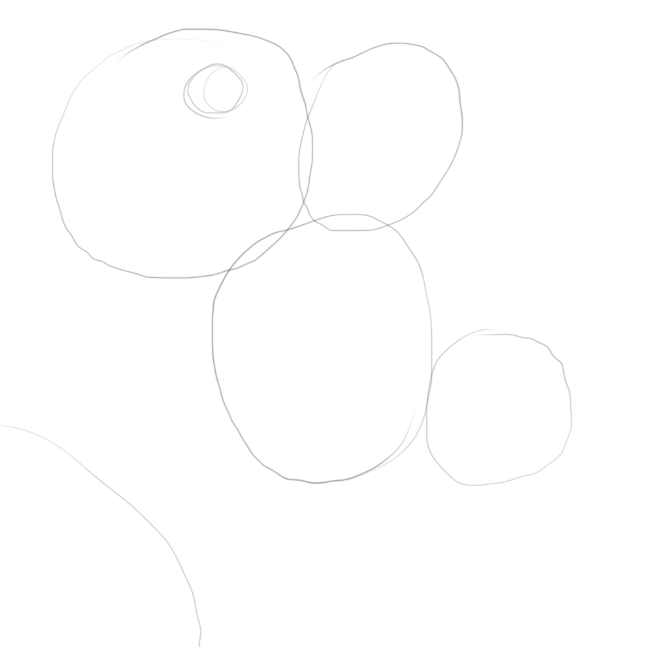
It’s now time to start our map. Grab a pencil and faintly draw in circles where your nations are. Nations that are allies or at war should be close. Those that rarely interact should be farther away, or have an insurmountable natural barrier between them. Drawing circles on a map may sound easy, but this stage can take a few tries to get the relationships right.

Jon Roberts_1BasicLayout
Stage 1: Circles. Yes, these are 6 interconnected nations!

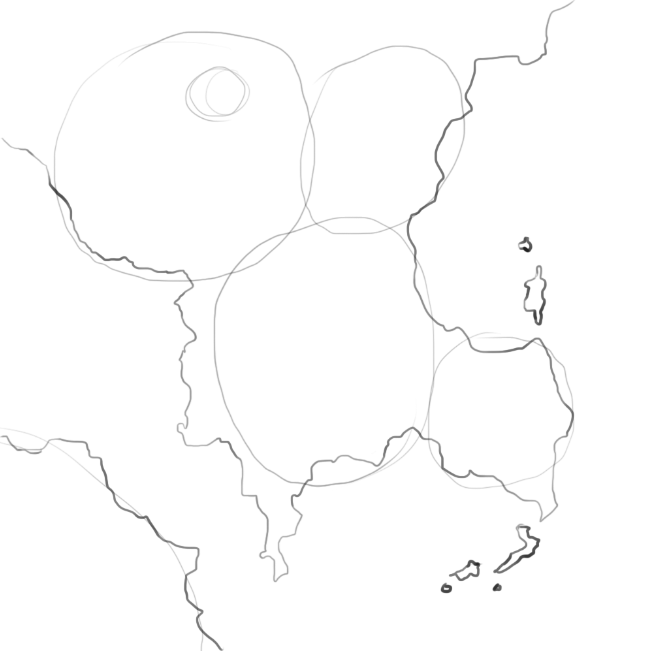
But circles aren’t really a map. Let’s draw some coastlines. Think about which of your nations need large coastlines and which should be landlocked. Then let your pen wander. Really – avoid straight lines. Coastlines are jagged and broken things. If your line doesn’t look like it was plotted by a drunken ant, you’re doing it wrong.

Step 2: The coastlines. Keep them broken and randomized.

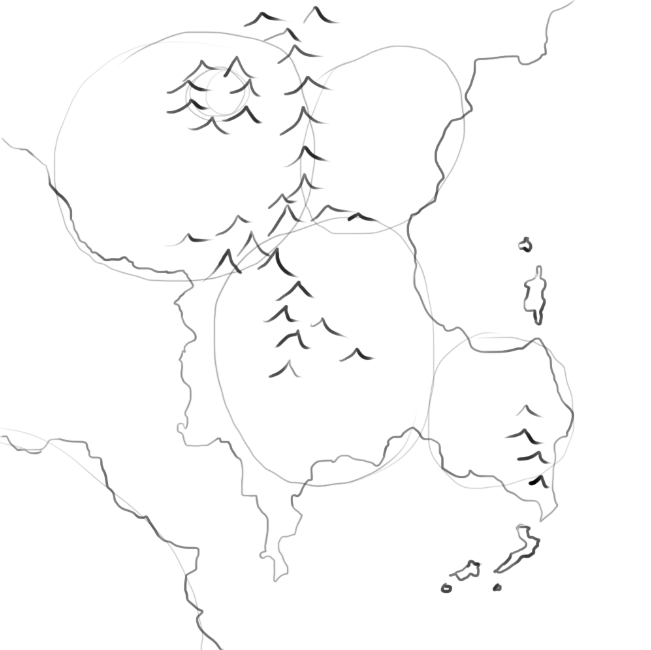
Now let’s lay in some mountains. Mountains tend to form ridges. Avoid the temptation to fill in whole blocks of land with mountains. Instead, lay them out in wavy lines. They often follow the edge of a coastline (think the Andes). From a story point of view, they form obstacles for your heroes and they create natural boundaries between nations, or between nations and the great unknown. Mountains also create boundaries between climates. So if you need a desert in one area and a jungle in the other, you’d better place a mountain range between them to stop the rain from the jungle getting to the desert.

Step 3: Mountains - they shouldn't be pretty, inverted triangles do the job just fine.
Step 3: Mountains – they shouldn’t be pretty, inverted triangles do the job just fine.

Next up, we have rivers. Rain falls on mountains and runs downhill to the sea. It always flows to the lowest point – and there’s always one lowest point. This means that rivers don’t branch as they flow to the sea, they only join. So – no rivers going from coast to coast. At some point that requires water to flow uphill. No lakes that have two separate rivers leading to the sea – remember, only one lowest point leading out. Think of a river like a tree. There’s one trunk where it enters the sea, but a panoply of branches reaching towards the mountains.

Rivers are also strategically important. There’s hardly a river mouth in the world without a town on it and most great cities lie on a river. If you know where your cities are going to be, make sure there’s a decent sized river flowing through them. Equally, rivers make great defenses. It’s hard to build a wall all the way along your nation’s border, but it’s almost as hard to get an army over a well-defended river as it is to have them scale a wall.

Step 4: As rivers run to the coast they only join, they never branch.

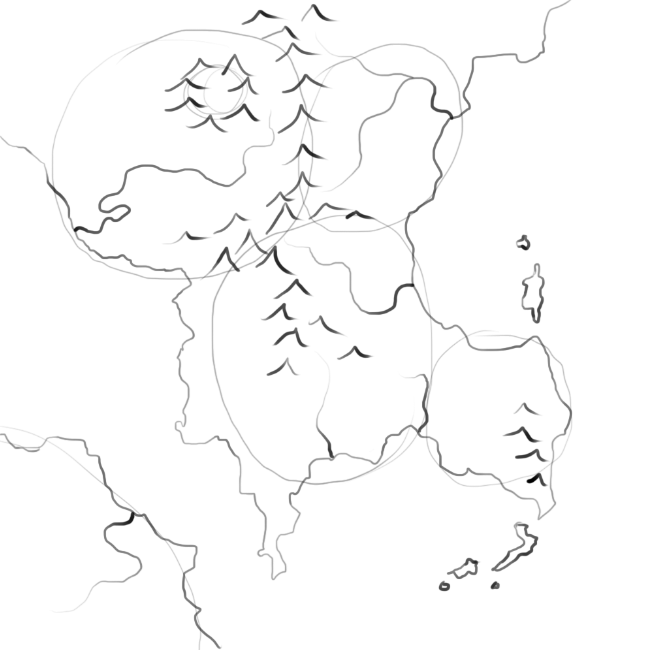
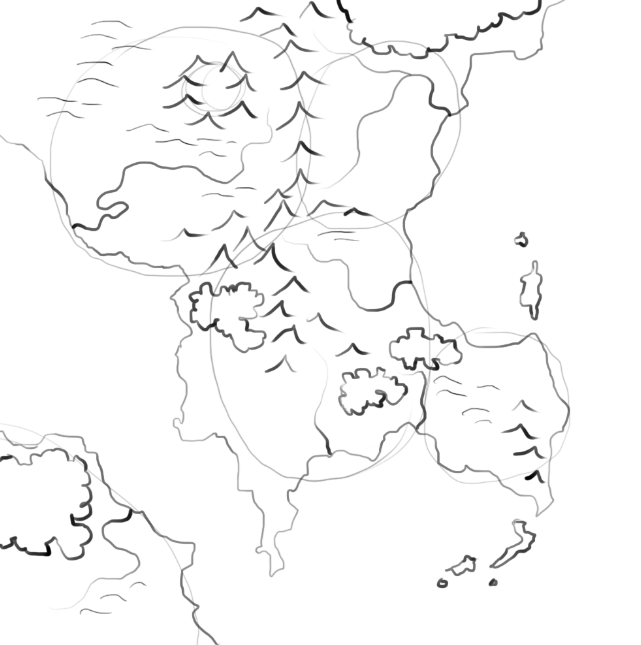
Add some hills to the edge of your mountain ranges. Lay in some forest and see how it looks. Remember, don’t be precious. If you don’t like it, start on a new sheet of paper. Sketch another coastline. Turn it upside down.

When you’re happy with the terrain, go over the pencil lines with pen, and erase the pencil–including your nation boundaries. Scan and photocopy the map. Go away and have some food.

When you come back, try the following experiment. Ignore your previous nations. Look at the virgin world with a new eye. If you were founding a country in the world, where would you start? What would be the key strategic choke points? Look at the world as if you were playing Civ. Where are the resources you need to defend, what lands would you try to annex? Use some colored pencils to sketch in different nations and boundaries. Edit the rivers if you need to, move things around. You’ve got lots of copies of the map–experiment.

Once you have a layout you like, we’ll add cities.

Step 5: Hills and Forests, add them wherever you see fit. These are easily moved.

Cities are where they are for a reason. They don’t just appear up in the middle of nowhere. Population centers need food, water, trade and security. Rivers can provide all of  these, which is why towns and cities tend to spring up at river mouths. Locate your capitals in places that are easily defended and that have good transport connections to the rest of the nation. Place smaller cities in key locations, whether that’s in the heart of a mining community on the edge of a mountain range, at a key strategic river crossing, or a market town in the middle of leagues of prime cattle-ranching land. At this point, also mark in major fortifications.

Step 6: Place cities, towns and fortifications.

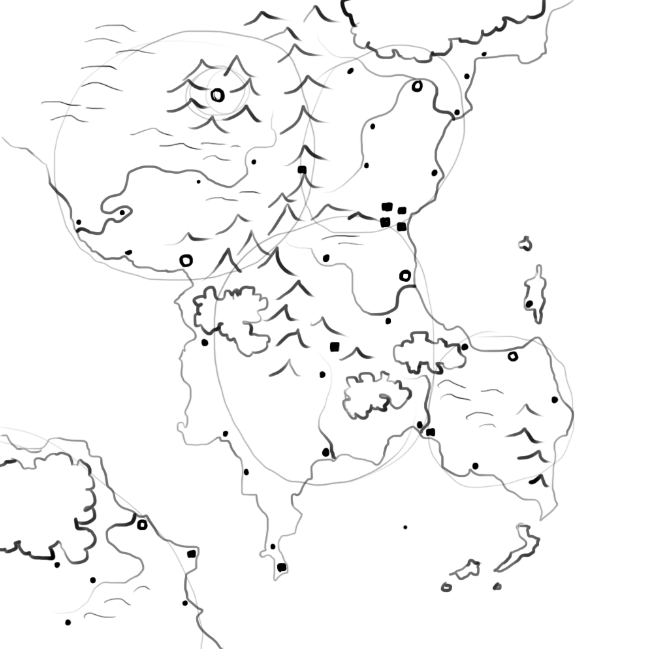
With these indicated it’s a simple matter to place the roads. These will connect the major cities, the main food producing regions, and any other major trade routes.

You now have a perfectly functional map! But remember, nothing is set in stone. Each time you run through this process your map will be better. Each time you sketch the map you’ll have new ideas. As you continue to write about your world you’ll come up with new thoughts on what terrain you should have, how two countries relate across their border, where a great wilderness needs to be. Redraw the map – it’s there for you. Both your map drawing and your text will be better for the relationship between map and story.

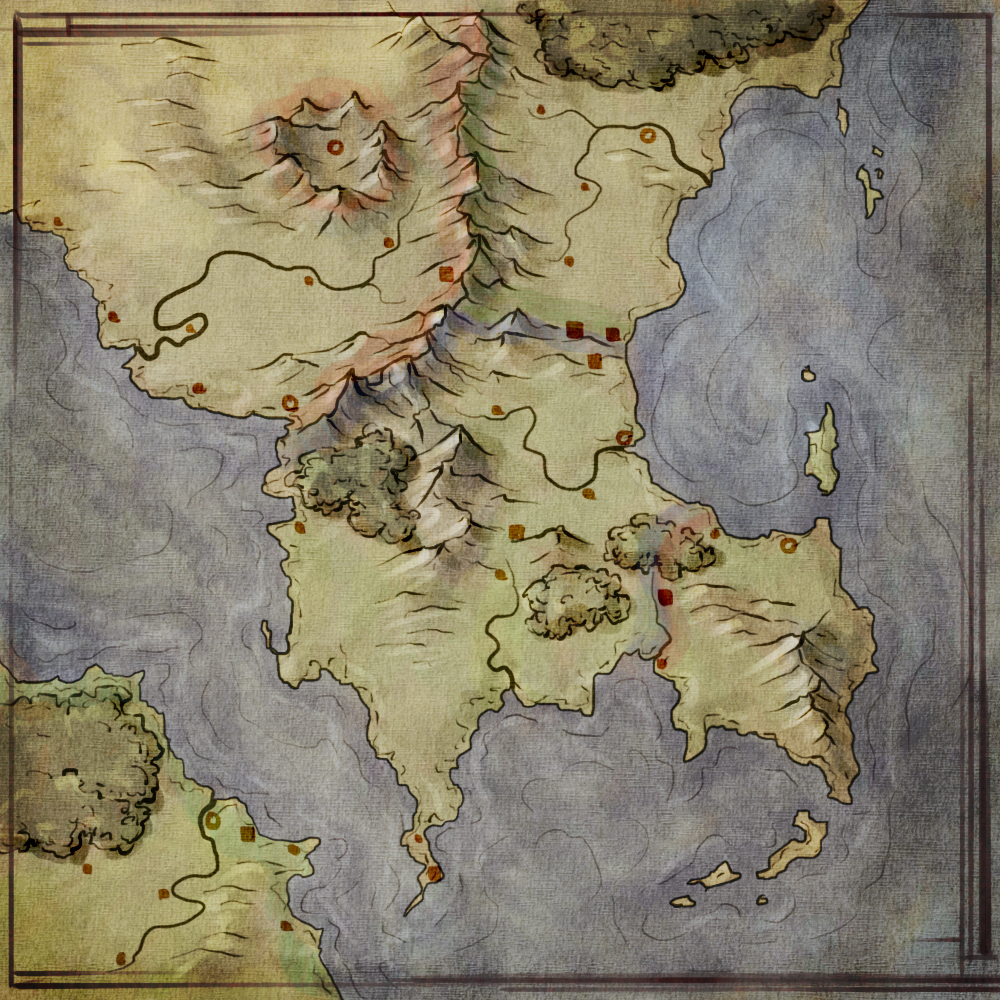
And when your manuscript is ready to go from draft to final, your map will be ready to go from sketch to illustration. But that’s a post for another day.

Step 7: Colored and finished!

If you want to learn about the art of mapmaking, then check out the Cartographers’ Guild, or my own tutorials.

Jonathan Roberts grew up in a old farmhouse between a ruined castle and a Bronze Age fort, so lands of the imagination were never far away. These days Roberts illustrates maps of real and imaginary worlds for a wide range of clients, from brides looking for an unusual wedding map, to the lands of Westeros and Essos for George RR Martin’s Song of Ice and Fire. Along with his own illustration work for books and games, Roberts has curated New York gallery shows of maps by illustrators around the world.

Editors: Freelance v. In-house

Jen Greyson
Author, Jen Greyson

I’ve had an opportunity to work with both an amazing freelance editor, Joshua Essoe, as well as an in-house editing team for the boutique publisher, The Writer’s Coffee Shop (of 50 Shades of Grey fame). Beyond my own experience, there are still a myriad of relationships depending on the size of the publishing house and skill of the freelancer, but I wanted to share my experiences with each to let authors know what they might be able to expect.

One of the biggest differences is the number of passes on a single work. When I hire a freelancer, money is a big part of the amount of time he can spend on my work. Unfortunately, my checkbook will only allow him one pass, so he has to hit everything in one sitting-plot issues, line editing, copy editing-the whole shebang. When I send it to my in-house team, money is still a factor, but now it’s on their side as to how many passes they can afford in overhead.

For my first book, the initial in-house edit focused on the overarching plot. I sent in a polished manuscript and after a couple weeks, I received a 10-page evaluation addressing suggested plot changes, crutch words, character inconsistencies, etc. I then had a few weeks to fix the issues and send the revised manuscript back. My freelancer addresses the same things as that evaluation, but he tackles his evaluation and in-line comments about my misspelled words and comma misuse, at the same time.

After that content edit, the house editors send me the line edit. From here, my in-house editor and I will work for a few weeks passing the manuscript back and forth until we get a clean copy (for me, 10 passes total). Then my copy editor gets to take a pass (I’m lucky in that I have a fantastic copy editor and she doesn’t hack my stuff to death–I’ve heard horror stories where sometimes the copy edit is worse than the line edits) and we work to get another clean copy (4-6 passes). Then a final proofreader gets to take a fresh look and be a final set of eyes, more passing around (2-3), and I sign off on a final copy.

Beyond the three editors working on the manuscript, there are also the other departments to consider, as well as the other books the house is launching. All those people and factors can play a part in the book’s final form.

But really, besides the amount of time and hands that touch the manuscript when comparing freelancers to in-house editors, everything else is the incredibly similar.

The good, the bad, and the horrifically disfigured.

However, and this is a big one — Not all freelancers are created equal and anyone can start a publishing company these days, so it’s incredibly important to do a huge amount of homework no matter which path to publication.

My pursuit of TWCS wasn’t accidental. Random House had just
paid seven figures for the rights to 50 Shades of Grey and the Greyson_evy_darknew adult genre was on the rise, in part due to the college age of the main character. My characters haven’t quite fit anywhere other than new adult, and I wanted a smaller publisher willing to go to bat for me and my characters without trying to force them into a different genre (like every other agent and editor I sent it to). TWCS had first-hand experience of launching a mega-hit and I wanted to take advantage of all that in marketing my book, Lightning Rider.

My decision to hire Joshua was just as purposeful. He’d already edited work for NYTBSA, David Farland, and other fantasy authors. Finding a freelance editor is easy-finding a GREAT one is tough. Before spending money on an editor, it’s always wise to ask for them to review a few pages and see if their style matches. Research the genres they work on and find one that works on what you write. Readers have very specific expectations whether they’re reading fantasy or romance or thrillers. If the freelance editor doesn’t know what those expectations are, you may end waste a lot of time and money.

Not all edits are created equal.

Whether I’m working with a freelance editor or my in-house editor, one thing remains the same. I’m the only one who can tell the tale. It’s up to me to make sure my characters are represented on the page like they are in my head. I know best how they react in certain situations, what their voices sound like, and I get to fight for them to make sure their story is told in the best way possible.

Both my freelance editor and my in-house editor have suggested changes that I didn’t agree with. Most of the time I can see where suggestions make a better story, or when grammar rules takes precedence, but sometimes . . . sometimes there are places where I’m unwilling to bend because I know where the story goes beyond this book, or when a simple word change in a bit of dialogue changes the tone so it’s no longer that character’s voice. I know where the story started a decade ago when these characters were children and their backstory took a major hit.

Sometimes, knowing when to ignore advice is as important as taking it.

From the moment she decided on a degree in Equestrian Studies, Jen Greyson’s life has been one unscripted adventure after another. Leaving the cowboy state of Wyoming to train show horses in France, Switzerland, and Germany, she’s lived life without much of a plan, but always a book in her suitcase. Now a wife and mom to two young boys, she relies on her adventurous, passionate characters to be the risk- takers. Jen also writes university courses and corporate training material when she’s not enjoying the wilds of the west via wakeboard or snowmobile.Her debut new adult fantasy, Lightning Rider, releases from The Writers Coffee Shop on May 31, 2013.


Dos and Don’ts of Working with an Editor

Author, Joshua Simon


There are many things an indie writer needs to consider when looking for an editor. Is the editor capable of providing you with the service you need:  content, line, or copy editing? Does the editor have reputable references? Based on the sample, does the editor’s style suit your own? Can you afford the editor’s service?

I think every writer needs to carefully consider each of the above questions during the selection process.  Though this topic is crucial to every writer, it is one that has been beaten to death.  So, I thought I would discuss what I feel every writer needs to consider after the selection process is complete. Below are my top Dos and Don’ts when working with an editor.

Dos:

  1. Do agree to terms ahead of time.

Be clear on expectations before work begins.

Do you want only that content edit or were you also expecting a copy edit as well?

Do you want the editor to provide a second round of edits in order to proof read your work after you’ve made the previous suggestions provided to you?

Do you need the editor to help you with writing the back cover, marketing materials, a press release, and text for your website?

Most editors probably won’t do all of the above but some might if you’ve discussed the scope of work ahead of time.  Don’t expect an editor to provide extra services (no matter how little) for free after the agreed upon work is completed. Their time is valuable and they have other clients besides you.

  1. Do meet your deadlines.

As I said, you are not your editor’s only client.  The time to schedule an editor is when your book is nearly complete, especially if you’re writing your first book.

Find out what your editor’s schedule is like and how long they think it will take to edit the book, and then plan accordingly. It is not unreasonable to wait weeks or months before an editor can start on your book. Expect the overall editing process to take several weeks or longer once the editor begins work. Variations will exist based on the length of the book, how good of a writer you are, and how many projects the editor works on at once.

As a side note, after you’ve had some experience in completing projects it will be easier to schedule an editor before actual completion.  Even then, I’d recommend giving yourself several weeks or even months of cushion.  It is much nicer knowing you’ve finished early and can get ahead on your next project rather than scrambling to complete something at the last minute and turning in shoddy work.

  1. Do ask for clarification.

Any editor worth their salt will clarify questions you might have on their suggestions. Otherwise, how can you determine if it is a valid change?  If an editor is unwilling to communicate with you in this way after giving you the manuscript back, I’d question using that person again.

  1. Do be prompt with payment.

But what happens if it costs more than I originally expected?  Too bad.

If you go to a car dealership and they give you an estimate for a brake job that later increases by several hundred dollars because things were worse than expected, can you get away with not paying them? Of course not. Can you imagine if your boss decided not to pay you promptly or not at all, and how that would affect your life?

For some editors, this might be their only source of income.  Therefore, don’t be late with their money.

If you decide their services were overpriced and not what you expected then the only thing you can do is not use them for future work.

  1. Do remember that a suggestion for change is not a demand for one.

As the writer, this is your story.  You need to be satisfied with it more than anyone else. Make changes only if you agree it improves the quality of the work. If you can’t make that decision on your own, bring in someone else to give you a second opinion.

I rarely disagree with my editor, but there have been a few times I decided against making his suggested changes.  This is partly because I had received differing opinions from my beta-readers and partly because the change would affect later parts of the story in works he had not yet edited.


Don’ts

  1. Don’t hand over a mess.

Your editor should not be the first person to read your manuscript besides yourself. Employ both alpha and beta-readers.  They will help you smooth out many problems long before your editor gets a hold of your story, especially in the way of content.  If nothing else, this step will help reduce the costs to you. The more time your editor spends cleaning up your mess, the more they will charge.

  1. Don’t expect your editor to do all the work.

Your editor shouldn’t have to re-write your book. They will rewrite sentences as needed, but they aren’t supposed to write chapters or sections for you (unless you’ve agreed they will act as a ghost writer).

  1. Don’t take it personally.

This is all a learning experience and a way to make you a better writer. I’ve improved significantly with each work I’ve turned into my editor, and a contributing factor to my improvement has been his feedback on each story.

Remember, an editor’s reputation will be held against the quality of your work as well. You don’t want an editor to blow smoke up your rear.  You want an editor to be honest about what is good and what isn’t so your story and characters can shine.

  1. Don’t be a jerk to your editor.

Like everything else in life, be professional. If I really have to explain what this means then you probably have bigger problems to worry about than everything I’ve mentioned above.

  1. Don’t lose sight of your ultimate goal.

You want a great book!

Joshua P. Simon is a Christian, husband, father, CPA, fantasy author, and heavy metal junkie. He currently resides in Atlanta, Georgia and hopes that one day he can leave the life of a CPA behind and devote that time to writing more of the ideas bouncing around his ADD-addled brain. You can find out more about him at www.joshuapsimon.blogspot.com.